Kali Linux is the recommended environment for getting started with 펜리전트. In the public Penligent README, the installation section explicitly lists Kali Linux as the recommended platform, and the Linux package is documented as compatible with both ARM and AMD architectures. For users who want a clean desktop installation flow instead of a source build, Penligent uses a Debian package install path on Linux, which fits naturally into a standard Kali workflow. (GitHub)
This matters because Penligent’s public documentation is not structured as a generic AI chat application setup guide. The docs describe a workflow that begins with runtime configuration, continues into project-based pentesting, supports Agent Mode and Manual Mode, allows re-validation of findings through TTP-backed verification, and ends with report generation and export. So the right way to think about installation is not just “get the app to open,” but “prepare a Kali environment that can support the documented Penligent workflow end to end.” (GitHub)
Before you install Penligent on Kali Linux
Before installing 펜리전트, confirm that your Kali machine matches the Linux package you downloaded and make sure you have a normal user account with sudo access. The public README documents Linux support as ARM and AMD compatible, and the Linux FAQ specifically warns users not to install the application as the root user directly in the terminal. Instead, the documented guidance is to install it using your logged-in user together with sudo. (GitHub)
You should also be ready to provide three required runtime settings the first time you open the application: the Python executable path, the script storage path, and the Bash executable path. The public config table gives /usr/bin/python3 as the example Python path and /bin/bash as the example shell path, while noting that a virtual environment is recommended for Python. That means a normal Kali installation with Python 3 and Bash already present is usually a strong fit for first-time setup. (GitHub)
Step 1: Download the Linux package
Penligent’s public install instructions show Linux installation through a .deb package. The README does not describe a source compilation step, a container bootstrap step, or a separate daemon process for the desktop app. That is useful for Kali users because it keeps the install path simple and consistent with common Debian-family package handling. (GitHub)
If you are running a typical x86_64 Kali VM or laptop, use the package that matches AMD64. If you are on ARM-based Kali hardware, use the ARM-compatible Linux package. The public documentation states Linux is supported on ARM and AMD, so architecture matching is part of getting the install right the first time. (GitHub)
Step 2: Install Penligent in Kali Linux
The public README gives the Linux install command in this form:
sudo dpkg -i penligent.xxx.xxx.deb
Replace the example filename with the real package name you downloaded. On a typical Kali machine, the flow often looks like this:
cd ~/Downloads
sudo dpkg -i penligent-<version>.deb
This is the documented Linux installation method in the public Penligent README. (GitHub)
Step 3: Fix missing dependencies if needed
If the package installs but reports missing dependencies, or if the application does not open correctly after installation, Penligent’s Linux FAQ provides a direct recovery path. The docs say the issue may be caused by missing dependencies and recommend installing the required dependencies according to the prompt, or using:
sudo apt install -f
That command is the first documented fix to try on Kali Linux if your Debian package install is incomplete. (GitHub)
In practice, the cleanest documented Linux sequence is to install with your normal user account using sudo, avoid installing as root directly, and run sudo apt install -f if dependency repair is needed. That keeps your setup aligned with Penligent’s published Linux FAQ instead of relying on undocumented workarounds. (GitHub)
Step 4: Configure the required runtime environment
On first launch, Penligent requires runtime configuration. The public config section lists three required fields: Python Executable Path, Script Storage Path및 Bash Executable Path. The example values in the public docs are /usr/bin/python3 for Python and /bin/bash for Bash, and the Python interpreter note says a virtual environment is recommended. (GitHub)
A typical Kali configuration may look like this:
Python Executable Path: /usr/bin/python3
Script Storage Path: /home/<your-user>/penligent-workspace
Bash Executable Path: /bin/bash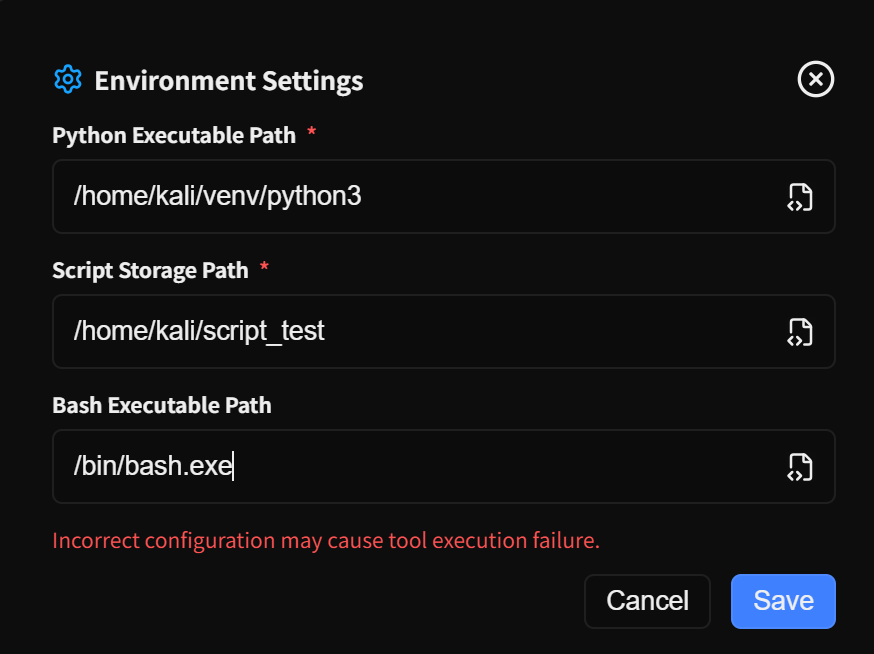
The only value you need to choose yourself is the workspace directory. In Penligent’s public docs, the script storage path is described as the directory for test scripts and workspace, so using a dedicated folder is cleaner than pointing to a temporary or shared location. (GitHub)
If you want to prepare that directory before opening the app, you can create it in advance:
mkdir -p ~/penligent-workspace
That is simply a practical Kali setup step built around the documented requirement for a script storage path. The underlying requirement itself comes directly from the public config table. (GitHub)
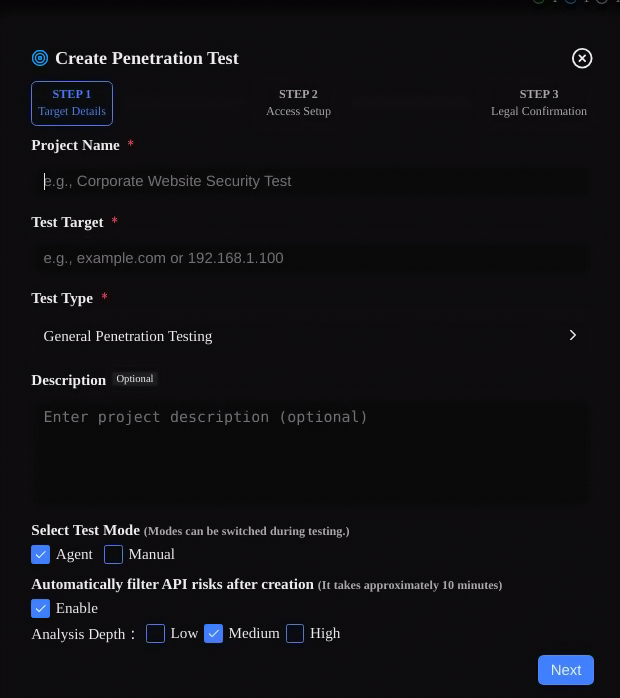
Step 5: Create your first pentest project
After installation and configuration, the next documented step is to click New Project on the left. Penligent’s public docs say project creation is split into multiple steps so users can supplement and confirm information before a pentest begins. In the first step, you enter target information and configure task execution options. The documented required fields are Project Name, Test Target및 테스트 유형. Optional fields include 설명, Mode, Automatically Filter API Risks및 Analysis Depth. (GitHub)
The docs describe Test Target as the target URL, IP, or IP range for pentesting. They describe 테스트 유형 as the type of pentest, such as agent test or general penetration testing. They also explain that the selected task type helps the Agent match different testing strategies. This is important for new Kali users because it means project setup is part of how Penligent decides what kind of workflow to apply. (GitHub)
In the second step, the public docs say you can optionally provide information that helps accelerate testing, such as credentials and key asset targets. In the third step, you must confirm that you have compliant authorization for the test target. If the new project target matches an existing project, the docs say an additional fourth step may appear asking whether to import information from the existing project into the current one. (GitHub)
Step 6: Choose the right mode after installation
Penligent’s public documentation describes three modes. Agent Mode is the default mode, where the system performs the pentest automatically and the user manually confirms key points. Manual Mode uses step-by-step confirmation and allows all tool commands to be edited by the user during the process. Ask Mode is analysis-and-Q&A only; it lets users ask questions based on current tasks and gathered information, and in this mode no tools will be executed. (GitHub)
For a first Kali Linux installation, Agent Mode is the easiest way to see the full product workflow with minimal friction. Manual Mode becomes more useful when you want tighter control over the step sequence and command editing. Ask Mode makes sense when you want reasoning over project context without actually running tools. Those distinctions are explicitly documented and matter for onboarding because the user experience changes substantially depending on which mode you choose. (GitHub)
The docs also mention an Online Search option in the input box. When enabled, the system can perform online searches as needed to obtain the latest threat intelligence and vulnerability information. That can be especially relevant on Kali when you are working in a live testing context and want fresher external context during a project. (GitHub)
Step 7: Understand what happens when the pentest starts
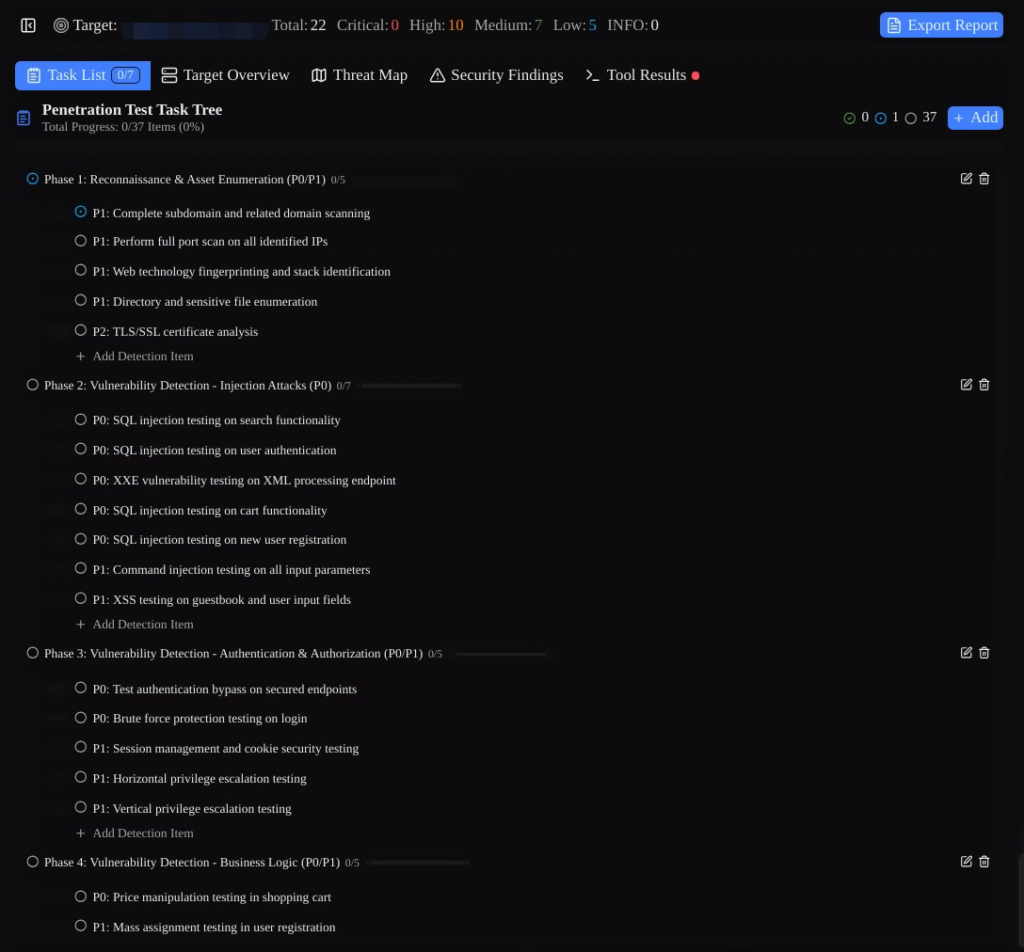
After you create the task, the public docs say the pentest workflow begins immediately. The documented first stage is initial information gathering and planning of the overall pentest approach and route, which the docs estimate at about five to ten minutes. Penligent also creates a testing task list that acts as a baseline checklist. During the pentest, users can edit tasks, delete them, retest, mark them as completed, or skip them. (GitHub)
The docs further explain that the overall pentest workflow is controlled in the dialog panel on the right, where users can direct the current action by clicking or typing. For Kali users coming from a more command-line-native background, this is a useful mental model: Penligent wraps the workflow into a project-driven interface, but still preserves a visible operational control layer during the run. (GitHub)
Step 8: Validate findings after discovery
Penligent’s public docs say discovered risks are recorded in Security Findings, and the execution results plus evidence chain for each associated tool are consolidated there. Users can click 확인 to re-validate a risk. According to the docs, once Verify is triggered, Penligent matches the vulnerability type to verification techniques and tactics, performs at least three rounds of verification, and then provides the verification result. (GitHub)
The same docs also say Penligent has 17 built-in categories of vulnerability verification TTPs. If a current risk cannot be matched to an existing TTP, Penligent creates a new TTP and, after successful verification, stores it in the TTP Library where it can be viewed and edited. This is one of the clearest documented parts of the product workflow and is worth emphasizing in any installation tutorial because it shows that the post-install experience is built around verified findings rather than just raw scan output. (GitHub)

Step 9: Generate and export reports
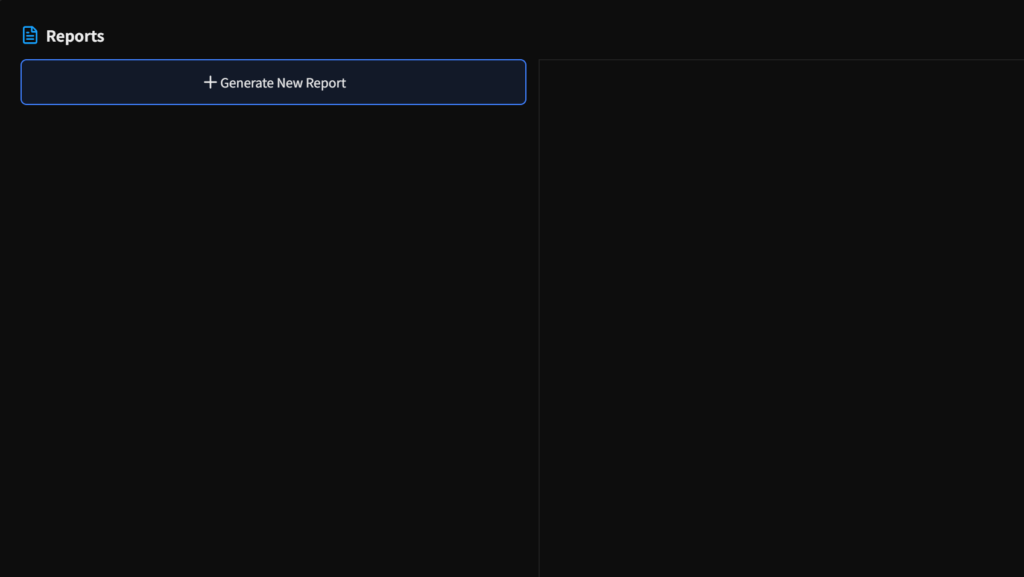
After project analysis is completed, Penligent’s public docs say users can generate a professional penetration testing report. The system automatically summarizes the analysis results and generates a standardized penetration testing report. The docs also say online editing is supported, allowing users to add remediation suggestions, adjust risk ratings, and customize other report content before export. (GitHub)
Export is documented in both Markdown 그리고 PDF formats. For Kali users, that is helpful because Markdown supports a text-native documentation workflow, while PDF is more convenient when you need a polished deliverable to share externally. Both export formats are explicitly listed in the public reporting section. (GitHub)
Main interface areas you should know after installation
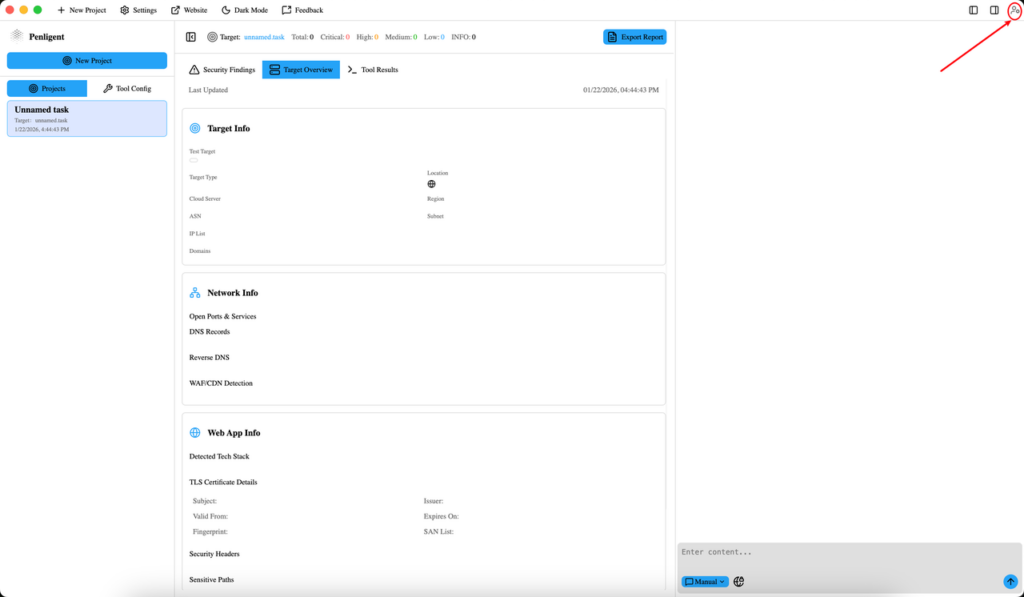
The public docs describe five major page features. Task List shows the checklist for the current pentest project and supports editing, deleting, and switching the active task. Target Overview contains full information about the current target, including related assets, network info, web app info, and any credentials configured earlier. Threat Map visualizes weaknesses for the current target, including sensitive paths, critical API endpoints, and discovered risks. Security Findings groups risks by severity and supports re-validation. Tool Results contains commands, raw outputs, and summaries for executed tools. (GitHub)
The menu bar is also documented. It includes Settings, TTP Library, Toolbox, Website, Light Mode / Dark Mode및 Feedback. The user center in the top-right includes View Plan, Login / Logout, Font Size, 언어및 Theme. For first-time Kali users, Settings and TTP Library are usually the most immediately useful because they tie directly to runtime configuration and validation logic. (GitHub)
Troubleshooting Penligent on Kali Linux
If Penligent cannot be opened after installation on Linux, the public FAQ gives two key checks. First, do not install the application as the root user directly in the terminal; use your logged-in user with sudo. Second, the problem may be caused by missing dependencies, in which case the docs recommend using sudo apt install -f. Those are the first official troubleshooting steps to follow on Kali Linux. (GitHub)
If the application cannot open the login web page, the docs say the issue may be caused by browser redirection failure or the local network. They recommend checking or switching your network connection and also provide temporary IPv6-disable commands as a troubleshooting option:
sudo sysctl -w net.ipv6.conf.all.disable_ipv6=1
sudo sysctl -w net.ipv6.conf.default.disable_ipv6=1
That guidance appears directly in the public login FAQ. (GitHub)
If scanning is too slow, the docs recommend reducing analysis depth, narrowing the testing scope, and checking network connectivity. If report export fails, the docs recommend checking disk space, trying a different export format, and restarting the app before trying again. Those recommendations are already documented and fit well into a Kali-focused onboarding guide because they address the most common early friction points after installation. (GitHub)
결론
Installing Penligent in Kali Linux is straightforward because the public documentation gives a clear Debian-package installation path, marks Kali Linux as the recommended environment, and explains the exact runtime settings required for first launch. From there, the documented workflow continues naturally into project creation, mode selection, initial information gathering, risk verification, and report export in Markdown or PDF. (GitHub)
If your goal is to follow the official Penligent workflow as closely as possible, the best path is simple: install the .deb package with sudo, repair dependencies if necessary, configure Python, Bash, and a dedicated script storage path, then create a small authorized project and learn the workflow through Agent Mode, Security Findings, and reporting. That sequence is the one most faithful to the current public docs. (GitHub)
자주 묻는 질문
Is Kali Linux the recommended environment for Penligent?
Yes. The public Penligent README explicitly says “Recommended: Kali Linux.” (GitHub)
How do I install Penligent on Kali Linux?
The documented Linux install command is sudo dpkg -i penligent.xxx.xxx.deb. (GitHub)
What runtime settings are required on first launch?
The public docs list Python Executable Path, Script Storage Path, and Bash Executable Path as required. (GitHub)
What should I do if the Linux app does not open after installation?
The official FAQ says not to install as root directly, and recommends sudo apt install -f if dependencies are missing. (GitHub)
Which report export formats does Penligent support?
The public reporting docs say export is supported in Markdown and PDF. (GitHub)